Tracker 8 help - Getting started
SIGN INTO TRACKER 8
After you sign up (or your organization signs you up) for Tracker 8, you'll receive an email with sign-in instructions. You don't need to install anything (unless you want to read barcodes with a smart phone).
THE MAIN MENU
After you sign in, the main menu looks like this on a smart phone or tablet (it looks slightly-different on a computer).
![]()
- Find and add to cart
- Fast add to cart
- Cart
- Data
- Utilities
- Help
- (on a computer) (on a smart phone or tablet) Sign out
Touch one of these links and its help page will open.
You may not see all these icons and choices in your copy of Tracker 8. What you see depends on the rights assigned to you by your organization's Tracker manager and the Tracker options your organization has selected.
FIND ITEMS
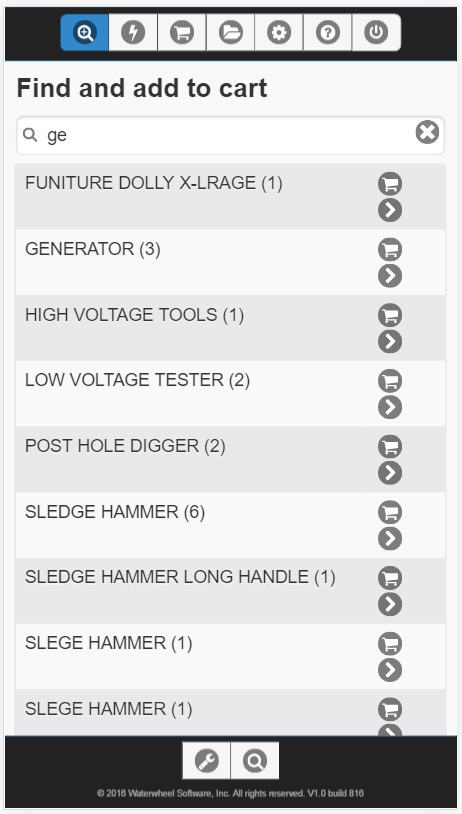
Touch the Find and add to cart icon in the main menu to open the find and add to cart screen.

If a search window appears, fill it in and touch OK. The search window appeared because an optional default search was set up for your copy of Tracker 8, a search that runs whenever the find and add to cart screen is opened. You can change or get rid of this default search (see searches).
Scroll through the list or search for the items you want. If you have a lot of data, it will be spread across pages: in the picture above, 3/7 (near the top, to the right of 'Find and add to cart') means that you have 7 pages of data and page 3 is currently displayed. Touch the icons at the bottom to navigate: takes you to the first page, the previous page, the next page and the last page.
Search (or refine the default search) by typing in the Search descriptions field, for example, descriptions that contain the letters 'ge'.
LEVELS
Your data is presented in 3 levels. Usually, the top-most level displays your organization's descriptions and the quantities of each. Drill down to the next level (which displays a description's current assignments) by touching to the right of a description. In the example below, all 3 generators are assigned to the default storage site.

Touch at the top left to return to the previous screen, to drill down to the next level (the specific items with the previously-selected description that are currently at the assignment you select).
GROUPING
We've been looking at data grouped by description then assignment, which is ideal if you want to know where your generators are. If you want to see a list of items at a job, touch the tool icon in the menu at the bottom of the screen then Group by assignment then description.
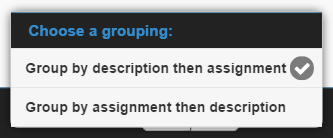
Now assignments (which can be jobs, employees or storage sites) are at the top level.

Drill down to the next level to see the descriptions currently at an assignment (in this case, the descriptions assigned to truck 26).
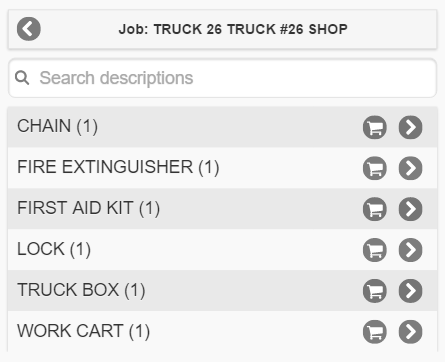
Drill down again to see the specific items assigned to truck 26.
ORDER ITEMS
Ordering items in Tracker 8 is like ordering from an online store: you find the items you want, add them to your cart then place your order.
You can add items to your cart from several screens, but we'll continue looking at the find and add to cart screen.
To add an item to your cart, touch the cart icon to its right.
You can add as many items to your cart as you like. When you want to see the contents of your cart, touch the cart icon in the main menu.
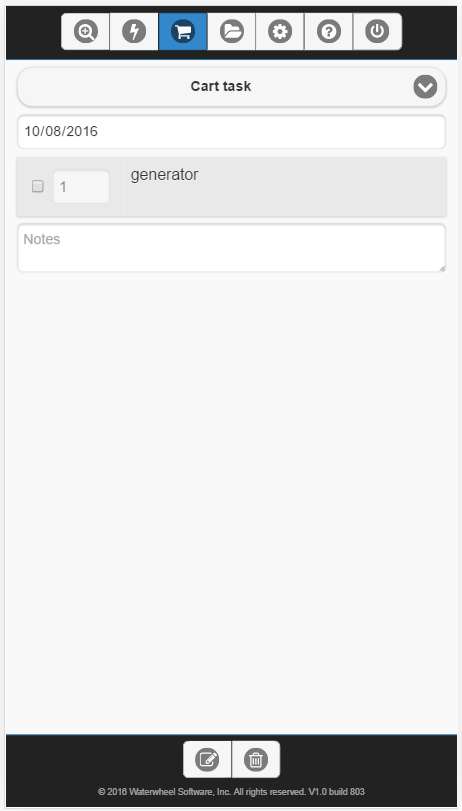
Touch Cart task and pick a task, for example, Assign to job.
Another button will appear, prompting you to enter the assignment (a job, in this case) you're ordering for.
Touch Place Order at the bottom to record your order.
If you see Actions instead of Place Order, touch Actions and a menu will appear with 2 choices: Place Order or Ship. Place Order means someone else will fulfill the order. Ship means you're fulfilling the order yourself, if, for example, you're a foreman sending items from one job to another.
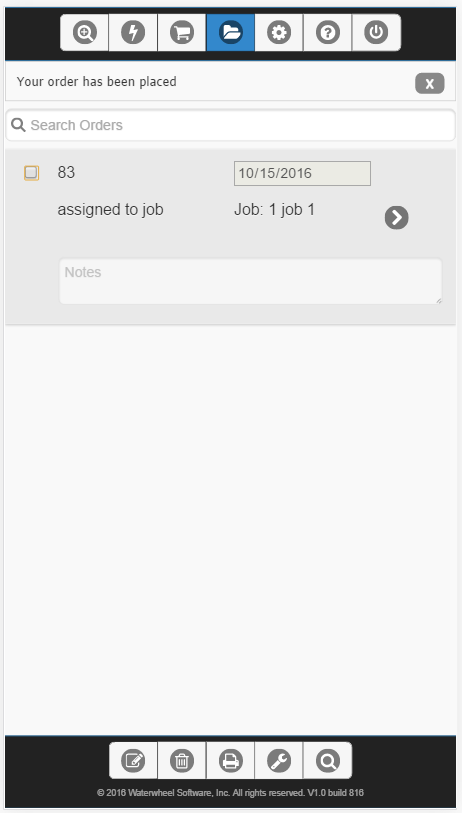
After you place or ship an order, the Orders screen opens. You can return to the Orders screen later (to check, for example, your order's status) by clicking the Data icon in the main menu then Orders.
SIGN INTO TRACKER 8
After you sign up (or your organization signs you up) for Tracker 8, you'll receive an email with sign-in instructions. You don't need to install anything (unless you want to read barcodes with a smart phone).
THE MAIN MENU
After you sign in, the main menu looks like this on a computer (it looks slightly-different on a smart phone or tablet).
![]()
- Find and add to cart
- Fast add to cart
- Cart
- Data
- Utilities
- Help
- Sign out
Click one of these links and its help page will open.
You may not see all these icons and choices in your copy of Tracker 8. What you see depends on the rights assigned to you by your organization's Tracker manager and the Tracker options your organization has selected.
ADD, EDIT AND DELETE JOBS AND STORAGE SITES
Click the Data icon in the main menu then Jobs. If none are listed, follow the directions below to add one or more. Do the same in the Storage sites screen (which is also in the Data menu).
To add a job or storage site, click the Add icon in the grid menu in the upper right corner of the Jobs or Sites grid.

To edit, click the Edit icon. If you click in the record or the field in the record you want to edit first, the cursor will appear in that record or field.
After you click the Add or Edit icon, the grid menu changes.
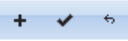
Click the Add icon to add another record, Fass the Save icon to save, the Cancel icon to undo any changes you've made since your last save.
Clicking the Add or the Edit icon puts you in editing mode. Once in editing mode, you can add or edit as many records as you like (but can't change your search or move to a different page) before saving or cancelling.
To delete, select the record(s) you want to delete by clicking the checkbox(es) in the left-hand margin of the grid (you can select more than one) then click the Delete icon in the grid menu.
ADD ITEMS
Click the Data icon in the main menu then Items (which is what Tracker 8 calls the stuff you're tracking: your tools, equipment, supplies, computers, office furniture, etc.). This is the screen you'll use to add, edit and delete items. If none are listed, follow the directions below to add one or more.
Click the Add icon in the grid menu and a menu will appear with 4 choices:
- Fast duplicate duplicates the item you've selected in the ITEMS grid and assigns it to the default storage site specified in your user preferences.
- New item wizard adds and assigns a new item.
- Duplicate item wizard uses the same screens as the New item wizard but is faster because it copies the item you've selected in the ITEMS grid (Fast duplicate is even-faster but less flexible).
- Add a row to the grid behaves like the add function in the Jobs and Storage sites screens. Normally, it's easier and faster to add items with one of the other options.
SEARCH FOR ITEMS
- Click the Search icon in the Items grid menu.

- A Quick search looks at the values in one field at a time. You can create or run more-complicated searches like Cost = 0 and Item cost ... (click searches for more information). For now, click Quick search.

- Select, in the left-most dropdown, the field you want to search. Calculated fields, which are calculated from the values in other fields, can't be quick searched and aren't listed.
- Select, in the second dropdown, the comparison you want.
- In the third field, enter the data you're looking for.
- Press Enter on your keyboard or click Search.
- Click Clear to undo the search, Cancel to undo the search and remove the quick search row.
ASSIGN ITEMS TO JOBS, STORAGE SITES, etc.
Assigning items in Tracker 8 is like ordering from an online store: you find the items you want, add them to your cart then place or ship your order.
You can add items to your cart from several screens, including Find and add to cart and Fast add to cart. The instructions here use the Item assignments screen (which lists your items' current locations).
- Click the Data icon in the main menu then Item assignments.
- Search for or scroll to the item you want to re-assign and click the cart icon to its right to add it to your cart. Do the same for any additional items you want to add to your cart.
- To examine the contents of your cart or place your order, click the Cart icon in the main menu.
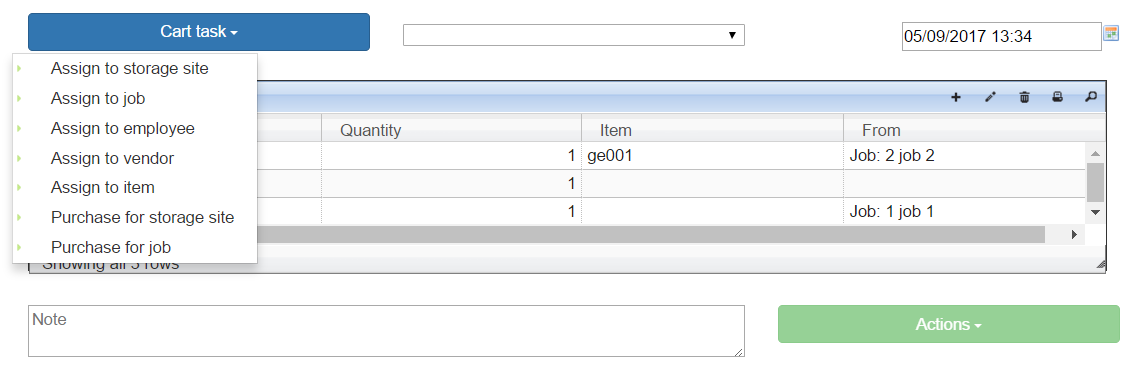
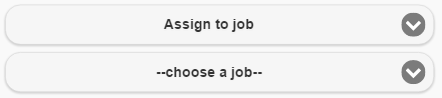
- Click Cart task and pick a task, for example, Assign to job if you want to assign items to a job (the options in the task list are described in Orders).
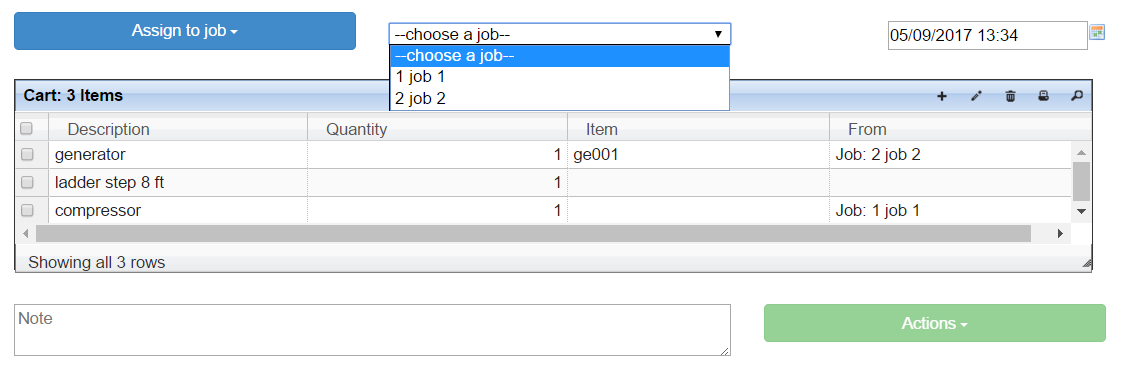
- Cart task changes to Assign to job and the dropdown to its right changes to --choose a job--. Click on the job you want. Depending on the options your organization manager has selected, you may see another optional or required dropdown for codes, employees or sub locations.
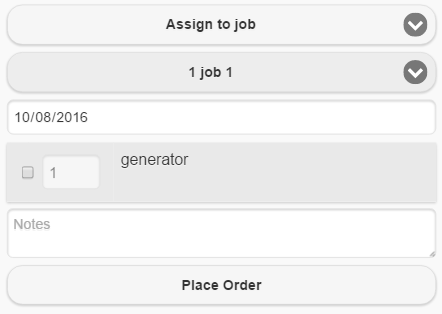
- The date in the upper right corner defaults to today but can be edited. It will be saved as the EXPECTED COMMENCE date in the Orders screen.
- Add items to, edit items in or delete items from the grid, for example, changing the quantity ordered (click the Edit icon in the grid menu to edit).
- If you enter a note in the lower left, it will appear in NOTES in the Orders grid.
- If you see a Place Order button at the bottom right, click it to record your order. If you see Actions, click it and a menu with 2 choices (Place Order and Ship) will appear.
- Placing an order in Tracker 8 is like ordering from an online merchant, who packs and ships your order. Shipping means you're moving items (you might be a warehouseman picking items for a job or a foreman sending items from one job to another). You'll probably select Ship, most of the time.
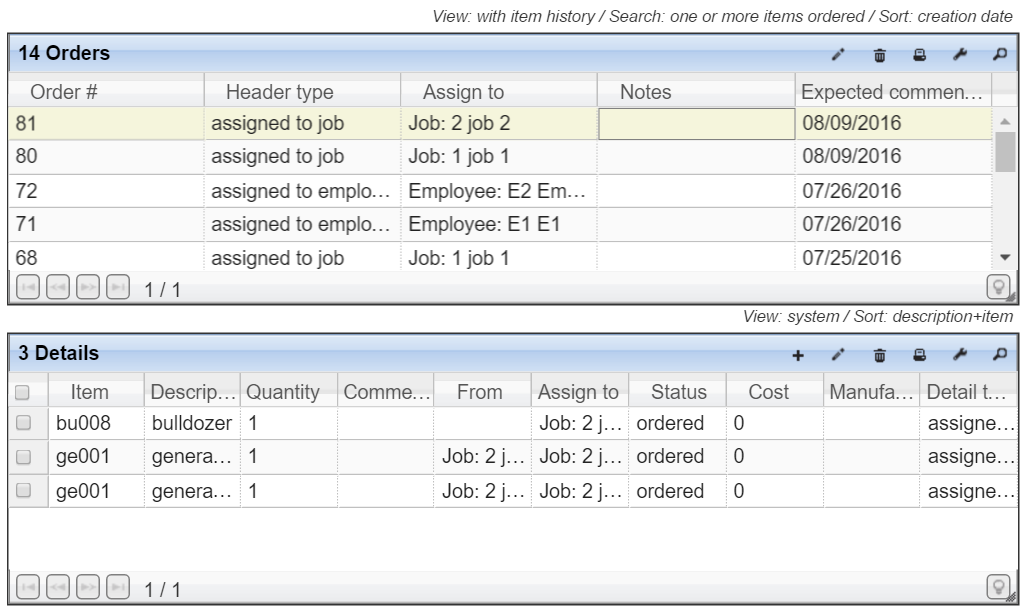
- After you place or ship an order, the Orders screen opens. You can return to the Orders screen later (to check, for example, your order's status) by clicking the Data icon in the main menu then Orders - assignments.
RUN A REPORT THAT LISTS THE ITEMS CURRENTLY AT A JOB
- In the Item assignments screen, run a quick search for the job you want.
- Click the Reports icon in the grid menu.
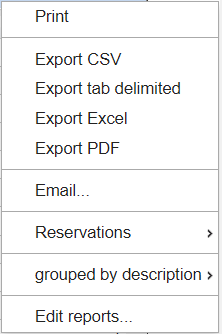
- This menu is for a screen with 1 grid (if your screen has 2, the menu will list both). The first 6 choices (through Email) are all for the same report (the other options are described in reports).
- Click Print. The report will appear in a window, from which it can be printed, and will include the columns currently displayed on your screen.
CUSTOMIZE YOUR TRACKER 8 GRIDS AND REPORTS
Tracker 8 grids can be customized. And what you see on your screen is what you'll see in most reports, so customizing one customizes the other.
If you'd like to customize your grids, read about views or contact us and we'll show you how.
MAKE ITEM ASSIGNMENTS YOUR DEFAULT SCREEN
If you'd like the Item assignments screen to appear when you first open Tracker 8, make it your default screen.
- Click the Utilities icon in the main menu then Preferences (if you see more than one tab, click User Preferences).
- Click the drop-down to the right of Default screen, Item assignments then Save.

SIGN INTO TRACKER 8
After you sign up (or your organization signs you up) for Tracker 8, you'll receive an email with sign-in instructions. You don't need to install anything (unless you want to read barcodes with a smart phone).
THE MAIN MENU
After you sign in, the main menu looks like this on a computer (it looks slightly-different on a smart phone or tablet).
![]()
- Find and add to cart
- Fast add to cart
- Cart
- Data
- Utilities
- Help
- Sign out
Click one of these links and its help page will open.
You may not see all these icons and choices in your copy of Tracker 8. What you see depends on the rights assigned to you by your organization's Tracker manager and the Tracker options your organization has selected.
ADD, EDIT AND DELETE JOBS AND STORAGE SITES
Click the Data icon in the main menu then Jobs. If none are listed, follow the directions below to add one or more. Do the same in the Storage sites screen (which is also in the Data menu).
To add a job or storage site, click the Add icon in the grid menu in the upper right corner of the Jobs or Sites grid.
To edit, click the Edit icon. If you click in the record or the field in the record you want to edit first, the cursor will appear in that record or field.
After you click the Add or Edit icon, the grid menu changes.
Click the Add icon to add another record, the Save icon to save, the Cancel icon to undo any changes you've made since your last save.
Clicking the Add or the Edit icon puts you in editing mode. Once in editing mode, you can add or edit as many records as you like (but can't change your search or move to a different page) before saving or cancelling. This is a big improvement over Tracker 7, where you must save a new or edited record before adding or editing another.
To delete, select the record(s) you want to delete by clicking the checkbox(es) in the left-hand margin of the grid (you can select more than one) then click the Delete icon in the grid menu. The ability to delete more than 1 record at a time is another big improvement over Tracker 7, where records can only be deleted one by one.
ADD ITEMS
Click the Data icon in the main menu then Items (which is what Tracker 8 calls the stuff you're tracking: your tools, equipment, supplies, computers, office furniture, etc.). This is the screen you'll use to add, edit and delete items. If none are listed, follow the directions below to add one or more.
Click the Add icon in the grid menu and a menu will appear with 4 choices:
- Fast duplicate duplicates the item you've selected in the ITEMS grid and assigns it to the default storage site specified in your user preferences.
- New item wizard adds and assigns a new item.
- Duplicate item wizard uses the same screens as the New item wizard but is faster because it copies the item you've selected in the ITEMS grid (Fast duplicate is even-faster but less flexible).
- Add a row to the grid behaves like the add function in the Jobs and Storage sites screens. Normally, it's easier and faster to add items with one of the other options.
SEARCH FOR ITEMS
- Click the Search icon in the Items grid menu.
- A Quick search looks at the values in one field at a time (like Tracker 7's simple begins-with or equals search). You can create or run more-complicated searches like Cost = 0 and Item cost ... (click searches for more information). For now, click Quick search.
- Select, in the left-most dropdown, the field you want to search. Calculated fields, which are calculated from the values in other fields, can't be searched and aren't listed.
- Unlike Tracker 7's simple begins-with or equals search, Tracker 8's quick search allows you to choose a comparison (like contains or greater than). Select, in the second dropdown, the comparison you want.
- In the third field, enter the data you're looking for.
- Press Enter on your keyboard or click Search.
- Click Clear to undo the search, Cancel to undo the search and remove the quick search row.
ASSIGN ITEMS TO JOBS, STORAGE SITES, etc.
Assigning items in Tracker 8 is like ordering from an online store: you find the items you want, add them to your cart then place or ship your order.
You can add items to your cart from several different order entry screens:
- Find and add to cart was designed for field people who use the Tracker occasionally but aren't real familiar with their organization's item numbers and descriptions.
- Fast add to cart is for warehouse people who use the Tracker often and are familiar with their organization's item numbers and descriptions. Most Tracker 7 users do. They know that, when they type a few characters into the order entry screen, Tracker 7 will display all the items whose item numbers start with those characters. Tracker 8 goes further and displays all the items whose item numbers or descriptions contain those characters.
- That said, many Tracker 7 users have asked for the ability to order from the Inventory screen. That's why we'll look here at ordering from Tracker 8's Item assignments screen which, like Tracker 7's Inventory screen, lists your items' current locations.
- Click the Data icon in the main menu then Item assignments.
- Search for or scroll to the item you want to re-assign and click the cart icon to its right to add it to your cart. Do the same for any additional items you want to add to your cart.
- To examine the contents of your cart or place your order, click the Cart icon in the main menu.
- Click Cart task and pick a task, for example, Assign to job if you want to assign items to a job (the options in the task list are described in Orders).
- Cart task changes to Assign to job and the dropdown to its right changes to --choose a job--. Click on the job you want. Depending on the options your organization manager has selected, you may see another optional or required dropdown for codes, employees or sub locations.
- The date in the upper right corner defaults to today but can be edited. It will be saved as the EXPECTED COMMENCE date in the Orders screen.
- Add items to, edit items in or delete items from the grid, for example, changing the quantity ordered (click the Edit icon in the grid menu to edit).
- If you enter a note in the lower left, it will appear in NOTES in the Orders grid.
- If you see a Place Order button at the bottom right, click it to record your order. If you see Actions, click it and a menu with 2 choices (Place Order and Ship) will appear.
- Placing an order in Tracker 8 is like ordering from an online merchant, who packs and ships your order. Shipping means you're moving items (you might be a warehouseman picking items for a job or a foreman sending items from one job to another). Most Tracker 7 users, after upgrading to Tracker 8, will probably select Ship, most of the time.
- After you place or ship an order, the Orders screen opens. You can return to the Orders screen later (to check, for example, your order's status) by clicking the Data icon in the main menu then Orders - assignments.
RUN A REPORT THAT LISTS THE ITEMS CURRENTLY AT A JOB
- In the Item assignments screen, run a quick search for the job you want.
- Click the Reports icon in the grid menu.
- This menu is for a screen with 1 grid (if your screen has 2, the menu will list both). The first 6 choices (through Email) are all for the same report (the other options are described in reports). Unlike Tracker 7, you can specify the export format you want (CSV, tab delimited, Excel or PDF) and email reports from the system (in Tracker 7, you have to 'print' them as a PDF then email them manually).
- Click Print. The report will appear in a window, from which it can be printed, and will include the columns currently displayed on your screen.
MAKE YOUR TRACKER 8 GRIDS AND REPORTS LOOK LIKE YOUR TRACKER 7 GRIDS AND REPORTS
Tracker 7 grids can be customized in limited ways. Tracker 8 extends those capabilities dramatically: among other things, you can create as many Views of a particular screen as you want, each containing different data.
In Tracker 7, screens and reports are separate. Customizing one has no effect on the other (which is why people often ask for simple changes to reports, for example, adding a column). In Tracker 8, what you see on your screen is what you'll see in your reports: the same columns, sort and search results. So customizing a screen and manipulating the data in it (for example, by sorting it) automatically creates a customized report.
If you'd like to customize your grids, read about views or contact us and we'll show you how.
MAKE ITEM ASSIGNMENTS YOUR DEFAULT SCREEN
Tracker 8 offers a large number of preferences you can use to tailor the system to your needs. For example, if you're going to use the Item assignments screen more than any other, you can make it the screen that appears when you first sign into Tracker 8.
- Click the Utilities icon in the main menu then Preferences (if you see more than one tab, click User Preferences).
- Click the drop-down to the right of Default screen, Item assignments then Save.
Organization managers can add users, set organization preferences and define reports, searches, sorts and views everyone in their organization can use.
- Read about users then add yours. Assign them to user groups (use the Copy user and groups macro, which is faster than entering each user's user groups manually).
- Email each new user a temporary password. Click the Tools icon in the grid menu, Macros then Email temporary password
- Read about preferences then enter yours. Your users might appreciate help with their user preferences, especially their Default screen. If you plan to use a portable barcode reader, set your organization's default site in the Organization preferences tab. If you have more than one storage site and want different users to have different default sites, have your users enter their default site(s) in User preferences.
- Read about searches. If some of your users will use the 'Find and add to cart' screen and that screen loads slowly, a default search will speed it up.
- Take a look at views, sorts and reports and add any important organization-level customizations (it's easy to add more, later).
IF YOU'RE ENTERING YOUR DATA FROM SCRATCH
Enter it in this order.
- Start with your jobs, storage sites and (if you plan to use them) employees and vendors.
- Then enter any codes and sub locations you plan to use.
- Finally, enter your items with the New item wizard or Duplicate item wizard in the Items screen.
If you have data in one or more spreadsheets, you can probably import it.
CONTACT US if you have questions or want to schedule training.
To get to the help page you want ...
- If you see Tracker 8 help in the main menu, click it and the Help - Contents page will open.
- If you see the Help icon in the main menu, click it and you'll generally be offered two choices: help for the page you're on and Help - Contents.
- To search the help system: if you see Search in the main menu, click it; if you see the Help icon, click it then Help - Contents and Search will appear in the main menu.
Help pages contain panels that can be toggled open or closed. Click a panel's title, for example, Using Tracker 8 help or Customizing and using grids in this screen, to toggle that panel open or closed. Click Toggle all in the upper right corner of the top-most panel to open all the panels that are closed and close all the panels that are open.
Help pages open in a new tab in your browser. To return to Tracker 8, click on its tab or close the help tab.
You may not see all the options and choices described in the help system in your copy of Tracker 8. What you see depends on the rights assigned to you by your organization's Tracker manager and the Tracker options your organization has selected.
CUSTOMIZING GRIDS
Grids can be customized temporarily or permanently.
Temporary customizations, which last only as long as the grid is open, include:
- Changing a column's width by dragging its heading's right border.
- Changing a column's sequence by dragging its heading to the left or right.
- Removing a column from the grid by right clicking on any heading and unchecking the column you want to remove.
To permanently customize a grid, create or edit a view. You can have several views of the same data, each with different columns. The current view is displayed above each grid on the right. If a saved or special purpose search or sort is active, it's also displayed.

If you have the required user rights, you can add and edit your own views, sorts, searches and reports. You can also specify your own default views, sorts and searches, all of which are used the first time you open a screen.
GRID MENU
The grid menu is in the upper right corner of each grid.
- Add
- Edit
- Delete
- Reporting
- Tools
- Search
- Save (appears when adding or editing)
- Cancel (appears when adding or editing)
Click one of these links and its help page will open.
You may not see all these icons and choices in your copy of Tracker 8. What you see depends on the rights assigned to you by your organization's Tracker manager and the Tracker options your organization has selected.
PAGES
Data are usually broken into pages of 50 rows (you can change that number in user preferences). This improves system performance by retrieving just a page of data at a time. Page controls are in the lower left corner.

If a grid contains more than one page, click the icons in the lower left to display the first, previous, next or last page. The numbers (2/9 in this example) tell you page 2 (of 9) is currently displayed.