Tracker 8 help - Barcoding
Including portable, stationary, smart phone and tablet barcoding, the barcode import screen and barcode labels
Waterwheel has worked with portable and stationary barcode readers for decades but is still experimenting with barcoding on smart phones and tablets. Our focus has been on apps that scan with cameras, but there are other options. Please contact us before buying anything so we can discuss which approach will work best in your organization.
Labels can be printed from the Tracker on sheets of label stock using standard printers. You can also export Tracker data to a label printer and/or use pre-printed labels.
PORTABLE BARCODE READERS temporarily store data, so you can use them when you're not close to a computer: in a warehouse, at a job, while loading or unloading a truck, etc. We recommend and sell the Worth Data TriCoder.
- ADVANTAGES. Time-tested. Well-built devices are rugged. Scanners read barcodes more-quickly than cameras.
- DISADVANTAGES. Expensive (a TriCoder costs $800). Must be programmed. While the TriCoder can be programmed to be reasonably smart, Waterwheel deliberately wrote dumb programs in an effort to make them easy to use (a smart device knows, for example, whether a job or item number is valid; the TriCoder, with dumb programs, doesn't know that).
STATIONARY BARCODE READERS are attached to a computer (with a cable, by radio or bluetooth, etc.), substitute for typing (they don't store data) and work well in tool rooms, where everything moves thru a door or across a counter and checkout speed is critical. They generally don't need to be programmed. We recommend and sell the Worth Data LZ365-USB.
- ADVANTAGES. Time-tested. Well-built devices are rugged. Scanners read barcodes more-quickly than cameras. Not expensive. Offers the same 'smarts' as typing into a program.
- DISADVANTAGES. You're tethered to your computer (if your reader communicates with your computer wirelessly, you still have to remain within range).
SMART PHONES AND TABLETS can work with barcode readers or, equipped with the right software, use their cameras to scan barcodes.
Most barcode apps that use cameras for scanning were designed for consumer use (to look up prices, etc.), but a few are appropropriate for industrial use. We recommend Scan to Web from Berry Wing.
- ADVANTAGES. Very inexpensive. Uses hardware you probably already own.
- DISADVANTAGES. Cameras read barcodes more-slowly than scanners. Some apps won't scan into some Tracker fields.
Barcode readers attached to a smart phone or tablet (generally with bluetooth). We've tested the Inateck BCST-10 (which is available from several online retailers).
- ADVANTAGES. Well-built devices are rugged. Scanners read barcodes more-quickly than cameras. Not expensive. Offers the same 'smarts' as typing into a program.
- DISADVANTAGES. You have to deal with 2 pieces of hardware (but can put your phone in a case and strap it to your arm and/or use a small reader that slips into your pocket or, in at least one case, can be worn as a ring). Android's virtual keyboard didn't work when the Inateck BCST-10 was on. That's not a problem if you're rapidly scanning a pile of tools, but if you want to type then scan then type then scan, you have to turn the reader off and on.
Barcode sleds into which a smart phone or tablet is inserted.
- ADVANTAGES. Well-built devices are rugged. Scanners read barcodes more-quickly than cameras. You only have to deal with one piece of hardware. Some sleds offer RFID capabilities.
- DISADVANTAGES. Expensive (there's a price range, but think ~$500). Sleds are available for only a few Android phones.
- UNKNOWNS. We haven't tested any sleds, so our knowledge is limited (if you're interested, Linea pro offers sleds for iPhones). If scanned data is treated like keyed data, sleds will offer the same 'smarts' as typing into a program. We don't know whether the barcode scanner on some sleds phones interferes with the phone's virtual keyboard.
Phones with built-in barcode readers.
- ADVANTAGES. Well-built devices are rugged. Scanners read barcodes more-quickly than cameras. You only have to deal with one piece of hardware. Some dedicated barcode phones offer RFID capabilities.
- DISADVANTAGES. Expensive (there's a price range, but think ~$600 or more + monthly network costs). You're buying most users a 2d phone. Android only.
- UNKNOWNS. We haven't tested any phones with barcode readers, so our knowledge is limited. If scanned data is treated like keyed data, dedicated phones will offer the same 'smarts' as typing into a program. We don't know whether the barcode scanner on some dedicated phones interferes with the phone's virtual keyboard.
Worth Data TriCoders are dedicated, portable barcode readers that work with the Tracker right out of the box, with no extra software or setup required. Please DO NOT follow the manufacturer’s setup instructions.
TRICODER BASICS
- Return to the TriCoder main menu by pressing the F1 key on the TriCoder keypad.
- If you're in the middle of a program, return to the beginning of that program by pressing the END key on the TriCoder keypad.
- If you're asked to answer a question YES or NO, press ENTER for YES, 0 (zero) for NO.
- The TriCoder shuts down automatically if not used for 5 minutes.
- If data is stored on the TriCoder when you start it, you'll get a 'data file exists' message if you try to collect data. If you remember where you were in the program, just keep going (the TriCoder will return to the prompt it displayed when it shut down). Otherwise, press END to return to the beginning of the program.
- The TriCoder can contain more than one application program but Tracker 8 currently works with just one: TriCoder program #1 (for item transfers). Program2 #2 (for physical inventory counts) and #3 (for adding to stock) were written for Tracker 7.
- Data may be keyed (using the TriCoder keypad) or scanned into the TriCoder. Press ENTER after keying in data.
- The blue SHIFT key toggles between numbers and letters. The cursor is an underline when you're entering numbers, a rectangle when you're entering characters.
ASSIGN ITEMS
- Turn on the TriCoder.
- Press 1 on the TriCoder keypad to collect data.
- Press 1 to transfer tools and equipment between jobs, employees and storage sites.
- If you see or hear DATA FILE EXISTS, press any key. If the file wasn't erased after the last upload, delete it (see DELETE A FILE FROM THE TRICODER, below). But if the TriCoder was turned off (or turned itself off) before being uploaded, either press the END key (which puts you at the beginning of the program) or, if you know where you were in the program, continue entering data.
- If you see TO in the display, key or scan in the job, employee, storage site or container number you're sending items TO.
- If you see LOCATION NOW, key or scan in the current location of the items you're re-assigning.
- If you see ID, key or scan in the item or barcode number you're transferring.
- If you see QTY, key or scan in the quantity you want to assign. The Tracker interprets blanks as 1: you can leave QTY blank and press the TriCoder ENTER key if you're transferring 1 item.
- You can enter as many items as you like for the TO + LOCATION NOW combination you entered. When you are done entering items for that combination, press the TriCoder's END key. The TO prompt will re-appear, ready for a new order.
- When you are done entering data, press F1 to return to the main TriCoder menu.
- Instructions for uploading data are in the next section of this help page ('the Barcode import screen').
EXAMINE AND EDIT DATA ON THE TRICODER
- Press the UP ARROW key (the key shows an arrow pointing up, not the words UP ARROW).
- Press BEGIN. You'll see the last data entered on the TriCoder.
- Use the following keys to move around your data file.
- BEGIN goes to beginning of your data file, END to the end.
- LEFT ARROW (the key has an arrow pointing left, not the words LEFT ARROW) takes you to the previous field, RIGHT ARROW to the next.
- UP ARROW takes you to the previous field with the same prompt as the current field (if you're looking at the QTY prompt, up arrow will take you to the previous QTY prompt). Down arrow takes you to the next field with the same prompt.
- If you want to edit an entry, DELETE deletes characters to the left of the cursor, CLEAR erases the field entirely. Key in or scan the data you want. If you key it in, press ENTER to save it. This is very important. If you change something then press a key other than ENTER (left arrow, perhaps), your change won't be saved.
- Press F1 to stop editing and return to data collection.
SEARCH FOR DATA ON A TRICODER
DELETE A DATA FILE FROM A TRICODER
- Do not connect the TriCoder to your computer.
- Turn on the TriCoder.
- Press 2 to upload data..
- You'll be warned that you're not connected to your computer. Press F2 to delete the file.
- You'll see END OF TRANSMIT. DEL FILE [YES/NO]? Press YES.
- You'll see ARE YOU SURE [YES/NO]? Press YES.
UPLOAD BARCODE DATA
- Open the Barcode import screen. Either click the Utilities icon in the main menu then Barcode import or, in the Orders - Assignments screen, click the Tools icon in the main grid menu, then Macros then Upload barcode data.
- In the Barcode import screen, click the Upload barcode data button.
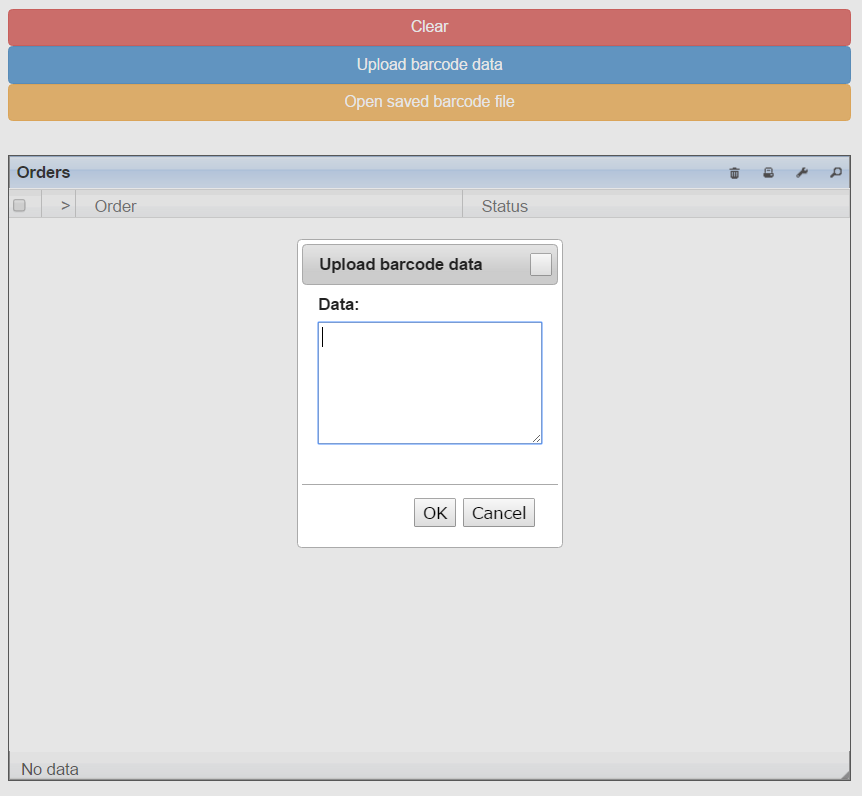
- Upload your barcode data or copy it into the Data field in the Upload barcode data window then click OK.
If you're using a TriCoder ...
- Plug the TriCoder into your computer. The manufacturer recommends turning it off first. Turn it back on after connecting it.
- Press 2 on the TriCoder keypad (DATA UPLOAD). Your data will stream into the Upload barcode data window.
- In the TriCoder display, you'll see 'End of transmit. Del file?' If normal letters and numbers were uploaded, press the TriCoder's Yes (Enter) key. You'll see 'Are you sure?' in the TriCoder display. Press Yes again.
PROCESS UPLOADED DATA
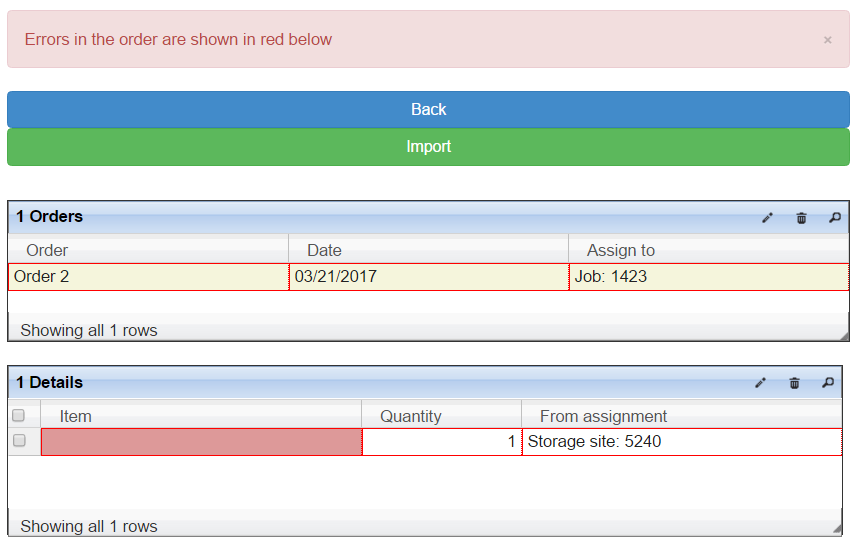
Uploaded data, which can be reviewed, edited, deleted, saved and re-opened before being imported, is broken into 'orders,' one order per assignment.
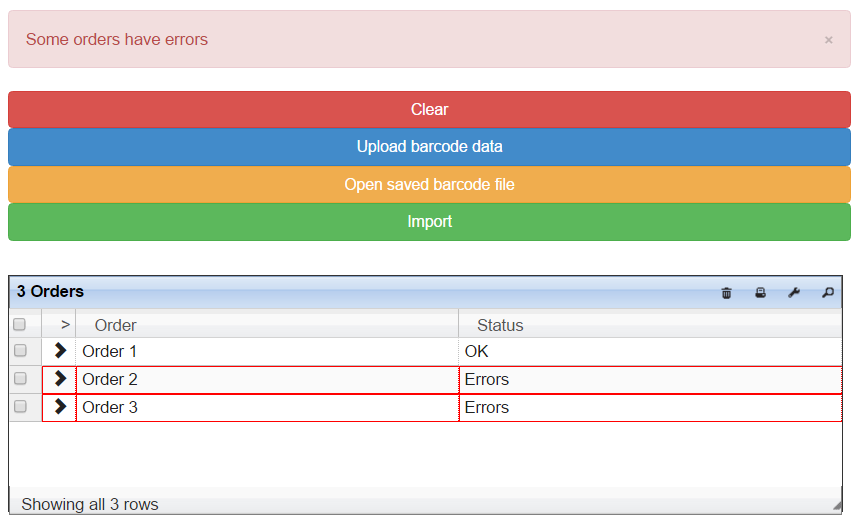
Orders with errors cannot be imported until the errors have been fixed or deleted.
To save the uploaded data without importing it, click the Tools icon in the grid menu then Save barcode file. To open a saved barcode file, click the Open saved barcode file button.
To print a report that lists the uploaded orders and the items in each order, click the Reports icon in the grid menu.
To import all the uploaded orders that don't contain errors, click the Import button. To import one order at a time or edit an order, click to the left of the order you want to work with.
Print shipping tags from the Orders - assignments screen after importing.
CODES USED IN THE UPLOAD BARCODE DATA WINDOW
- T for To
- L for Location now
- D for Date
- I for id
- P for Dept
- Q for Qty
- B for Broken
- E for By (Empno)
Stationary barcode readers are attached to a computer (with a cable, by radio or bluetooth, etc.) and substitute for typing. They work well in tool rooms, where everything moves thru a door or across a counter and checkout speed is critical.
When assigning items to jobs, storage sites, etc. with a stationary barode reader, use Fast add to cart. When taking physical inventories, use Count or verify. Both screens were designed to be used with scanners.
While the Tracker will work with stationary hardware from many different manufacturers, we recommend Worth Data hardware, which we know to be reliable and which requires no setup. If you buy hardware from another source, you may need to set it up yourself or pay us to set it up for you. Make sure it reads code 128 barcodes and automatically adds an ENTER after every scan. If you want to read UPC (Universal Product Code) barcodes, which are printed on most commercial packaging, your reader should automatically delete the first and last digits of UPC barcodes (NOT code 128 barcodes) and switch automatically between UPC and code 128 labels.
HOW TO SET UP SCAN TO WEB
- Buy Scan to Web from the Apple or Google store.
- Install and start Scan to Web then click on the gear icon at the bottom of the screen.
- Enter 'https://www.wwsoft.net' in HOME PAGE URL. At the bottom, under AFTER BARCODE SCAN, touch JavaScript (*advanced). Then Touch the icon in the upper left corner (an arrow circling left) to exit the setup screen.
- Touch the home icon at the bottom of the screen to open wwsoft.net.
- Touch the menu icon (3 horizontal lines) in the upper right then Sign into Tracker 8.
- After signing in, touch the Utilities icon in the main menu then Preferences (if you're an organization manager, touch the User preferences tab).
- Touch Use smart phone or tablet camera for scanner (if it's unchecked) then Save.
HOW TO ASSIGN ITEMS WITH SCAN TO WEB
Don't use the barcode icons at the top and bottom of the Scan to Web screen. Use the Scan button in the Fast add to cart screen, instead.
- Touch in the main menu to open the Fast add to cart screen.
- Touch the Fast add to cart from button and enter the assignment your items are coming from. This limits the search to items at that assignment and speeds things up. This is optional if you're just using the Scan button but is required if you want to use Batch scan.

- Touch Scan to turn the camera.
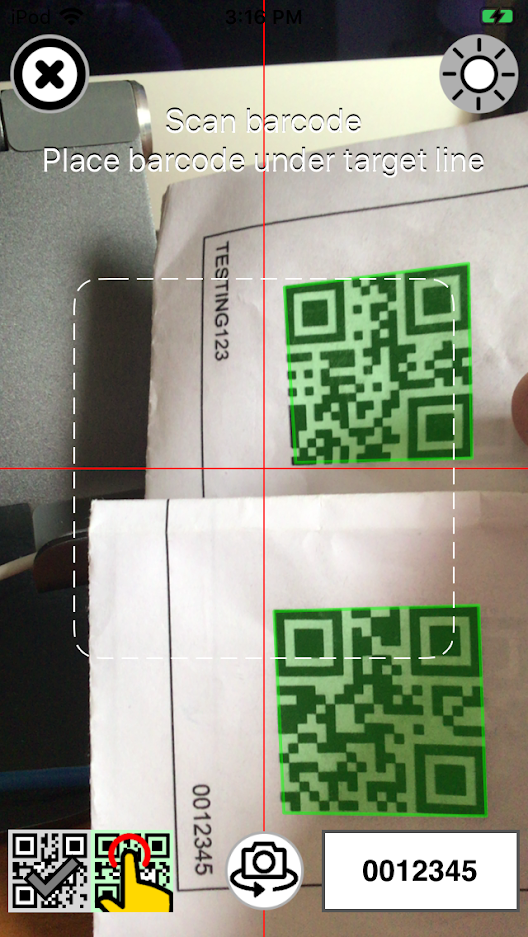
- The check icon in the lower left is selected by default. When it's selected, the camera scans the first barcode that enters its field of vision. If your codes are close together, touch the hand icon, hold your device so the red cross-hairs on the screen point at the code you want then touch the hand icon again.
- Your device will beep, the camera will be turned off and the data entered in the Tracker as if you'd typed it. Touch Scan to scan again.
- Optionally, if you've entered a Fast add to cart from assignment, touch Batch scan to open a sub-window and turn the camera on. Scan a barcode. The Tracker will automatically turn the camera off, enter the scanned data in the sub-window and turn the camera back on, ready for another scan. You can scan several barcodes in quick succession. When you're done, push the X in the upper left corner of your screen (your camera will be on) to return to the Tracker then click the OK button in the sub-window to process the scanned data.
HOW TO COUNT OR VERIFY ITEMS WITH SCAN TO WEB
Don't use the barcode icons at the top and bottom of the Scan to Web screen. Use the Scan button in the Count or verify screen, instead.
- Click the Utilities icon in the main menu then Count or verify.
- Click the At button at the top of the screen, an assignment type then an assignment.
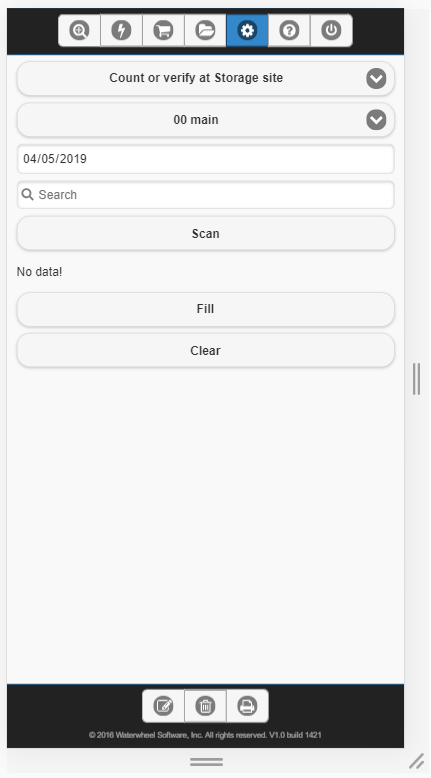
- The date in the upper right defaults to today. Change it, if you're planning to update small tool and consumable quantities and want to record a different date.
- Touch Scan to turn the camera on.
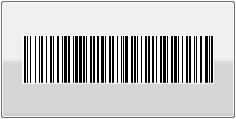
- If you're using 1-dimension barcodes like this, hold your device so the red line on the screen runs thru the barcode horizontally. Give it a moment to auto-focus. Your device will beep, the camera will be turned off and the data entered in the Tracker as if you'd typed it. Touch Scan to scan again.
HOW TO PRINT BARCODE LABELS FROM THE TRACKER
- The default label size is 1 x 2 5/8 inches. If you want another size, click the Utilities icon in the main menu then Preferences (organization managers need to click the User preferences tab), select a Barcode label size and click Save.
- Open the Items, Jobs, Employees or Storage site screen.
- Optionally, search for the data you want to print.
- Click the main grid reports icon.
- Click Barcode labels. For the sake of layout accuracy, labels are automatically exported to PDF files.
This prints sheets of item, job, employee, and storage site barcodes on label stock or plain paper. Many companies print some barcodes (for example, their jobs) on plain paper and put them in a binder or on a clipboard. If you store consumable or quantity items in bins or on shelves, you can print labels and affix them to those bins or shelves.
Test a few labels before printing large quantities. Barcodes printed by some low-resolution printers don't work (or don't work well). If you trim your labels, leave at least 1/4" on each side of the barcode. The scanner needs this space to read accurately and consistently.
HOW TO USE PRE-PRINTED LABELS
Tracker 8 uses cross references to associate pre-printed labels with items. To add a cross reference for a pre-printed label:
- Click the Data icon in the main menu then Items.
- Click the Tools icon in the main grid menu, then Views, then with cross references.
- Click on the item you want to assign a pre-printed barcode label to.
- Click the Add icon in the lower grid menu.
- Enter the barcode number from the pre-printed label in the Reference number column.
- Click the Save icon in the lower grid menu.
If clicking the Add icon doesn't add a row in the lower grid, your organization manager needs to turn cross references on.
- Click the Utilities icon in the main menu, then Preferences, then the Organization preferences tab.
- Check Use cross references and click the Save button.