Tracker 8 help - Repair and maintenance
Including maintenance due, maintenance schedules, maintenance types, meter readings and repairs (only available with the optional repair and maintenance module)
Use the repair and maintenance module to track repairs and meter readings and schedule preventive maintenance.
Repair and maintenance work is entered in the Repairs screen, where you can also print work orders and repair history reports and specify which job to bill for the work. Repair and maintenance parts and labor costs can be tracked at a summary level or, if you have the supplies and small tools module, in detail. If you track in detail, you can use the Tracker to manage your parts inventory.
Meter readings not associated with repair or maintenance work are entered in the Meter readings screen, as are meter readings you want to bill.
Maintenance is set up in the Maintenance types and Maintenance schedules screens. Anything that's time or meter-based can be set up as a maintenance type, including warranty and lease expirations, calibration schedules and vehicle re-registration dates.
When maintenance comes due, an alert is tripped and the Maintenance due screen updated (to open that screen, click the Data icon in the main menu then Maintenance due
RECORD REPAIRS AND MAINTENANCE
- Click the Data icon in the main menu then Repairs.
- To add a record, click the Add icon in the grid menu in the upper right corner of the grid.

- To edit, click the Edit icon. If you click in the record or the field in the record you want to edit first, the cursor will appear in that record or field.
- After you click the Add or Edit icon, the grid menu changes.
- Click the Add icon to add another record, the Save icon to save, the Cancel icon to undo any changes you've made since your last save.
- Clicking the Add or the Edit icon puts you in editing mode. Once in editing mode, you can add or edit as many records as you like but can't change your search or move to a different page until you save or cancel.
- To delete, select the record(s) you want to delete by clicking checkbox(es) in the left-hand margin of the grid (you can select more than one) then click the Delete icon in the grid menu.
- If a repair includes maintenance, add maintenance types in the Maint type repairs sub grid.
- You can also add repair records from the Maintenance due screen by clicking the Tools icon in the Maintenance due grid menu, Macros then Create repair record. This automatically adds the maintenance selected in the Maintenance due screen to the newly-created repair record.

- Parts and labor costs can be tracked at a summary level by entering data in PARTS and LABOR or, or, if you have the supplies and small tools module, by assigning parts and labor to the item you're repairing in the standard order entry screens. A short-cut way to start such an order is to click the Tools icon in the Repairs grid menu, Macros then Add maintenance list items to cart. This is essential if you're using maintenance lists.
- After creating an order, enter its order number in the Repairs grid ORDER ID. Only one order can be assigned to a repair. If you need to add to or edit a repair's detailed parts or labor, edit the order you've entered in the repair record. Don't create another order.
- When a repair record is added, EXPECTED COMMENCE is filled in with today's date. Edit that, if the work was completed on a prior date or you're entering a repair planned for the future.
- Mark a repair complete by filling in the COMPLETE date.
- If you have the billing module and want to bill a job for this repair, enter the job number in BILL TO ID.
PRINT WORK ORDERS
- Select the repair record you want to print a work order for then click the Reports icon in the grid menu then Work order. Maintenance part lists are automatically added to work orders. You don't need to create an order to list them there.
PRINT REPAIR HISTORY REPORTS
- Click the Reports icon in the grid menu then Repair history.
RECORD AND BILL METER READINGS
- Click the Data icon in the main menu then Meter readings. Follow the instructions above (under RECORD REPAIRS AND MAINTENANCE) to add, edit and delete meter readings.
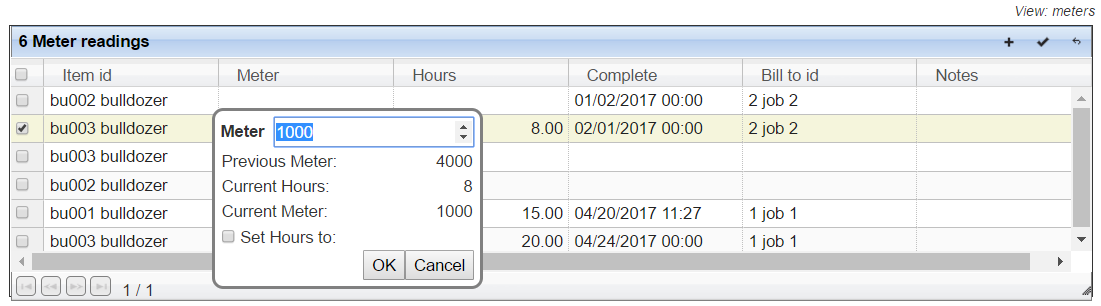
- If you're billing for meter hours and an item has (in the Items screen) a METER TYPE of 'Hours,' the sub window pictured above will appear when you edit METER or HOURS. When you edit METER, the Tracker will calculate the hours since the last meter reading; when you edit HOURS, it will calculate the new meter. If you want to record the calculated number, check Set Hours to or Set Meter to then click OK.
- If you're billing for meter hours, enter the job number in BILL TO ID.
ENTER MAINTENANCE SCHEDULES AND ASSIGN THEM TO ITEMS
- Divide your equipment into groups that require the same maintenance. Give each group a name: these will be your maintenance schedule names. Use names that make the differences between similar groups clear, for example, 'gas pickups' and 'diesel pickups.' You can use Tracker descriptions as names if the new schedule will be used with just that one description (maintenance schedules that will be shared between different descriptions shouldn't use Tracker descriptions as names).
- Click the Data icon in the main menu then Maintenance schedules. Follow the instructions above (under RECORD REPAIRS AND MAINTENANCE) to add your maintenance schedules (they can also be imported). Enter a DESCRIPTION ID if the maintenance schedule will be used with just that one description (leave DESCRIPTION ID blank if a maintenance schedule will be used with more than one description).
- Click the Data icon in the main menu then Items. If the Items grid doesn't include MAINTENANCE SCHEDULE ID and METER TYPE, click the Tools icon in the grid menu, Views then System.
- Follow the instructions above (under RECORD REPAIRS AND MAINTENANCE) to edit your items' MAINTENANCE SCHEDULE IDs. If an item uses an hour meter, enter 'Hours' in METER TYPE ('Distance' is assumed if METER TYPE is blank).
ENTER MAINTENANCE TYPES AND ASSIGN THEM TO MAINTENANCE SCHEDULES
- Think thru the maintenance tasks each group requires. Give each task a name, for example, 'pickup lube oil filter.' These will be the names of your maintenance types after you've refined them.
- Maintenance types can be shared between groups if they're identical (a simple 'annual inspection' task might qualify). But types that have different schedules or use different parts (if you're tracking them) need different names when used with different groups, for example, a vehicle oil change required every 3,000 miles needs a different name than a heavy equipment oil change required every 250 hours.
- Click the Data icon in the main menu then Maintenance types. Follow the instructions above (under RECORD REPAIRS AND MAINTENANCE) to add your maintenance types (they can also be imported).

- The meter period is the number of meter ticks (distance or hours) between maintenance; the time period is the number of days between maintenance. Fill in either or both. If you leave one blank, it will be ignored, for example, an 'annual inspection' maintenance type with a blank meter period and a time period of 365 days will ignore meter readings and trip every 365 days. If you fill in both, maintenance will be due when the first one trips, for example, a 'lube oil filter' maintenance type with a meter period of 3,000 miles and a time period of 90 days will trip when a vehicle has travelled another 3,000 miles or 90 days have passed, whichever occurs first.
- Meter and time warnings are optional. Meter warnings are the number of meter ticks before the meter period ends you want an alert to appear, for example, if the meter period is 3,000, the meter warning is 500, and maintenance is due at 15,000 miles, the alert will trip at 14,500 miles. Time warnings are the number of days before the time period ends you want an alert to appear, for example, if the time period is 90, the time warning is 15, and maintenance is due 7/1, the alert will trip on 6/16.
- Most maintenance types are one-time maintenance tasks like 'change the oil every 3000 miles' but some are manufacturer-specified maintenance chains. Each part of the chain has a label, for example:
- At 150 hours, a: lube, oil change
- At 300 hours, b: A1 plus another small task, for example, inspect tires
- At 450 hours, c: A1 plus a big task
- At 600 hours, start over
- Enter the chain labels in the CHAIN field separated by commas, for example (and using the labels from the example just above), 'a, b, c'.
- If you have a list of maintenance schedules with their associated maintenance types, assign maintenance types to maintenance schedules in the Maintenance schedules screen (you can go the other direction, if you wish, and assign maintenance schedules to maintenance types in the Maintenance types screen). In either case, if you don't see the relevant sub grid, click click the Tools icon in the grid menu, Views then System.
ADD MAINTENANCE PARTS, LABOR ITEMS AND MAINTENANCE LISTS
Supplies and small tools modules required.
If you want to record specific parts and labor with repairs, add your parts and labor in the Items screen. Labor IDs should be entered as consummables with descriptions that includes the word LABOR. This will ennable the Tracker to separate labor and parts costs on repair tags and reports.
If specific parts and/or labor are often used with a maintenance type, create a maintenance list and assign it to that maintenance type in the Maintenance types screen.
ENTER YOUR INITIAL MAINTENANCE RECORDS
Newly-added maintenance data doesn't trip maintenance due alerts or appear in the Maintenance due screen until maintenance records are added in the Repairs screen.
Newly-added maintenance data does, however, trip maintenance missing alerts. One way to add repair records for missing maintenance is to click, in the Alerts screen, to the left of the maintenance missing alert. A list of items missing maintenance will open. Click to the left of an item and the Items screen will open. If you want to add the missing maintenance to the Repairs screen, click the Tools icon in the grid menu, Macros then Create repair record(s) for missing maintenance.
Another way to add repair records for missing maintenance is to simply enter those records directly in the Repairs screen. This is probably the best approach if you have a list of recent maintenance work.
In either case, you can enter work that's been completed or that you want to schedule in the future.
FIELDS
items.meter hour or distanceSAVED SYSTEM REPORTS
- (Repairs repairs view) REPAIR HISTORY. Subtotals PARTS and LABOR by item number.
SPECIAL PURPOSE REPORTS
- WORK ORDER. Lists the work to be done on an item. Includes the maintenance parts associated with any maintenance types included in the repair.