Tracker 8 help - Import
This help page describes the Import function in the grid Tools menu. If you have data in an electronic format, for example, a spreadsheet, it can generally be imported into the Tracker.
You don't need to be a computer expert to import data but do need a basic understanding of file formats (like xls and txt) and relational databases.
Your import file can contain entirely-new records, updates of existing records or both.
The Import function isn't designed to convert Tracker 7 data into Tracker 8 formats. Contact us if you want to do that.
IMPORT DATA
Backup your data before importing.
- Set your data up in spreadsheets, one spreadsheet per Tracker table (Tables and fields lists the Tracker's tables and the fields in each).
- Enter the Tracker field names you want, one at the top of each column. Use the names in the FIELD column in Tables and fields, carefully matching the spelling, punctuation and capitalization. You don't need to provide data for or list every Tracker field. Just include the columns you're interested in (except required fields, explained below). Your columns can be in any order.
- Enter the data you want to import, one row per record. In some cases, capitalization is unimportant. But if you're importing data the Tracker displays in a list (description types, for example), be careful to match the capitalization and spelling used in the Tracker.
- Your import file can contain entirely-new records, updates of existing records or both.
- New records must contain values for all the fields with an X in the REQUIRED column in Tables and fields.
- Records you want to update must include a value that already exists in the Tracker in a field that can't be duplicated. If, for example, you want to
import items and update item number 12345, your import file must contain the item_number column and have a row whose item_number is 12345.
To update customers, include the customer number
To update descriptions, include the description name
To update employees, include the employee number
To update jobs, include the job number column
To update rate types, include the rate type name
To update storage sites, include the storage site number
To update vendors, include the vendor number - Save the file as text with a delimiter (comma, tab, colon or semicolon). Don't use delimiters that are in your data, for example, if your data contains commas, don't use comma-delimited (CSV) files. If you're working with a multi-sheet spreadsheet, save each sheet in a separate file.
- Open the screen that contains the grid you want to import into. Click the Tools icon in the grid menu then Import.
- Click Choose file. Navigate to and click on the file you want then click Open.
- Specify the separator used in your import file (tab, comma, colon or semicolon).
- Click Truncate table if you want to erase the table you're importing into before importing your file.
- Click Import and your data will appear.
- To edit, click the Edit icon in the grid menu in the upper right. If you click in the record or the field in the record you want to edit first, the cursor will appear in that record or field.
- After you click the Edit icon, the grid menu changes. Click the Save icon to save, the Cancel icon to undo any changes you've made since your last save.
- Clicking the Edit icon puts you in editing mode. Once in editing mode, you can edit as many records as you like but can't change your search or move to a different page until you save or cancel.
- To delete, select the record(s) you want to delete by clicking checkbox(es) in the left-hand margin of the grid (you can select more than one) then click the Delete icon in the grid menu.
- Click IMPORT to import your data. Bad data is ignored, for example, if 'abc' is in your spreadsheet in a column that's supposed to contain numbers or dates, it's ignored.
IMPORT DATA WITH RELATIONS
Identify the one-to-many relation you want to use in relations sorted by table 1 then table 2 and/or relations sorted by table 2 then table 1).
- First, import or enter the data at the 'one' end of the relation.
- Then create an import file for the data at the 'many' end of the relation. One column must point to a field in the 'one' table and must use the field name from that table, not the 'many' table (this is the 'Related parent field'). The values entered in that field must match the spelling, punctuation and capitalization of the data in the 'one' table, exactly.
- Select or create a view that displays the 'one' table in the main grid and the 'many' table in a subgrid.
- Import into the subgrid, entering the Related parent field that matches the imported data with the data in the main grid.
For example ...
| item # | description |
| 1001 | pickup truck |
| 1002 | wrench |
| 1003 | pickup truck |
The Tracker items table is at the many end of a one-to-many relation with the descriptions table. So, before importing your items, you need to enter or import your descriptions.
- The column headings in the descriptions import file must match the field names in the Tracker description table (in this case, 'description' needs to be changed to 'description_name').
- The description_type field is required in the descriptions table (as shown in Tables and fields). The possible values (Vehicle, Equipment, ExpensiveTool, InexpensiveTool, Consumable, SerializedConsumable, Intangible, List) must be entered exactly as spelled and capitalized in the Descriptions screen.
| description_name | description_type |
| wrench | InexpensiveTool |
| pickup truck | Vehicle |
Open the Descriptions screen, click the Tools icon in the main grid menu, Import, then follow the instructions under IMPORT DATA, above.
After importing your descriptions, import your item numbers.
- With one exception, the column headings in the items import file must match the field names in the Tracker items table (in this case, 'item #' needs to be changed to 'item_number'). The exception is the related parent field: that column heading needs to use the name of the related field in the descriptions table (the table at the 'one' end of the one-to-many relation). In this case, 'description' needs to be changed to 'description_name.'
- Save the spreadsheet as a text file.
| item_number | description_name |
| 1001 | pickup truck |
| 1002 | wrench |
| 1003 | pic kup truck |
- To import into the items table (the table at the 'many' end of the one-to-many relation), open a view that displays that table as a subgrid. In this case, open the Descriptions screen. If Items aren't displayed as a subgrid, click the Tools icon in the main grid menu, Views then with items.
- Click the Tools icon in the main grid menu then Import.
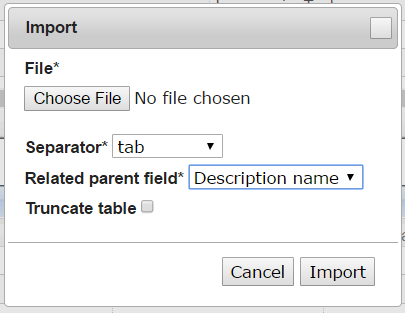
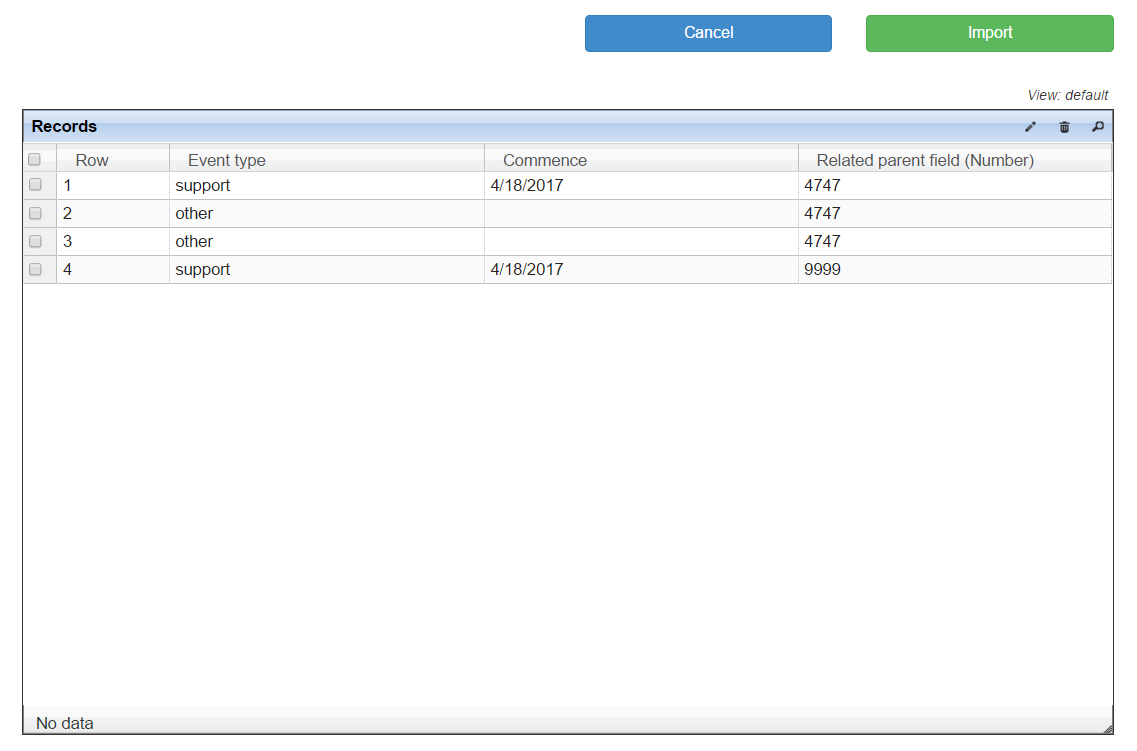
You're importing into the table at the 'many' end of the one-to-many relation and need to specify the Related parent field (in this case, the Description name) that will be used to relate the imported data to the table at the 'one' end of the one-to-many relation.
IMPORT MORE THAN ONE RELATION INTO THE SAME TABLE
Many Tracker tables include relations to more than one table. The items table, for example, contains relations to descriptions and rate types. Since you can import just one relation at a time, you need to separate your data into separate files, one for each relation, and import those files separately.
- Your initial import should contain all required fields. An import into the items table, for example, should contain at least your item numbers and description names. You can include additional data, but don't include other relations (like rate type name).
- Create and import one file for each additional relation, for example, a file that contains just your item numbers and rate type names.
IMPORT START-UP DATA
Import your initial, start-up data into Tracker 8 in this order.
- descriptions, manufacturers and codes
- rate schedules, rate types, maintenance schedules and maintenance types
- items
- order points, cross-references, lists and list items
- jobs, storage sites, employees and vendors
- sub-locations (add storage site sub-locations in the Storage Sites or Jobs screen in the with sublocations view
- holidays
FIELDS
- (Records grid) ROW. The row number assigned by the Tracker, not imported.
- (Records grid) The names of the fields in the import file.
- (Records grid) RELATED PARENT. Only appears when importing into a subgrid. The field that will be used to match the imported data with the existing data in the main grid.